Building a Professional Image Watermarking Solution with C# and .NET
A step-by-step journey from idea to implementation
As a developer, I recently needed a simple way to add watermarks to multiple images at once. Instead of using online tools or expensive software, I decided to build my own solution using C# and .NET. What started as a quick console app evolved into a complete watermarking toolkit with both command-line and desktop interfaces.
The Problem
Every content creator faces this challenge: you have dozens of images that need watermarks. Maybe it’s your photography portfolio, product images for your store, or graphics for your blog. Doing this manually, one image at a time, is tedious and time-consuming.
I wanted something that could:
- Process multiple images in one go
- Give me control over watermark position, size, and transparency
- Work with different image formats
- Be fast and reliable
The Solution: A Three-Part Architecture
Instead of building one monolithic application, I decided to create a modular solution with three components:
1. The Core Engine (PodScribeX.WatermarkEngine)
This is the heart of the application – a clean, reusable library that handles all the image processing logic. It uses the excellent SixLabors.ImageSharp library for image manipulation.
public class WatermarkProcessor
{
    public async Task<WatermarkResults> ProcessImagesAsync(
        string inputFolder,
        string outputFolder,
        string watermarkPath,
        WatermarkOptions options)
    {
        // Image processing magic happens here
    }
}
The engine supports:
- Multiple image formats (JPG, PNG, BMP, TIFF, WEBP)
- Flexible watermark positioning (corners, center, tiled)
- Opacity and scaling controls
- Batch processing with progress reporting
2. Console Application (PodScribeX.WatermarkEditor.Console)
Perfect for automation, scripting, or when you just want to get things done quickly without a GUI.
dotnet run -- --input "C:\MyPhotos" --output "C:\Watermarked" --watermark "logo.png" --opacity 0.7
The console app follows professional patterns:
- Clean command-line argument parsing
- Helpful usage instructions
- Progress reporting
- Proper error handling
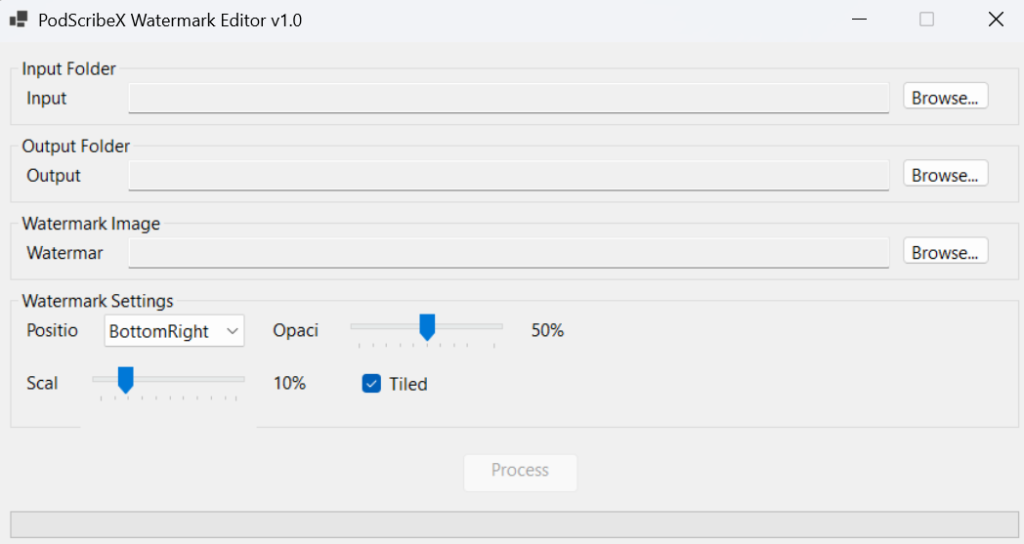
3. Windows Forms Desktop App (PodScribeX.WatermarkEditor.Windows)
For users who prefer a visual interface, I built a clean Windows Forms application with:
- Intuitive file/folder selection
- Real-time preview of settings
- Progress bars and status updates
- Drag-and-drop simplicity
Key Design Decisions
Why Three Separate Projects?
Separation of Concerns: The core engine knows nothing about UI or command-line arguments. The console app doesn’t need to know about Windows Forms. Each component has a single responsibility.
Reusability: Want to add a web interface later? Just reference the core engine. Need to embed watermarking in another app? Same thing.
Testing: It’s much easier to unit test a focused library than a monolithic application.
The Folder Structure
I organized the code using a clean architecture pattern:
├── Services/          # Business logic
├── Models/           # Data structures
├── Configuration/    # Settings and constants
├── UI/              # User interface (Windows Forms only)
This makes the code easy to navigate and maintain.
Smart File Dialog Handling
One challenge with desktop apps is helping users find their files easily. My solution automatically detects the project directory by walking up from the executable location looking for the .sln file. This means file dialogs always open in the right place.
For input selection, instead of just showing empty folders, I use a file dialog that lets users see actual image files. When they select an image, the app uses that file’s directory as the input folder. Much more user-friendly!
Technical Highlights
Async/Await for Responsiveness
Image processing can take time, especially with large batches. The Windows Forms app uses async processing to keep the UI responsive:
private async void ButtonProcess_Click(object? sender, EventArgs e)
{
    SetUIEnabled(false); // Disable buttons during processing

    var progress = new Progress<string>(message => {
        labelStatus.Text = message;
    });

    var result = await _watermarkService.ProcessImagesAsync(_options, progress);

    SetUIEnabled(true); // Re-enable when done
}
Progress Reporting
Both applications provide real-time feedback using IProgress<T>:
progress?.Report($"Processing {fileName} ({current}/{total})");
Error Handling That Actually Helps
Instead of cryptic error messages, the applications provide clear, actionable feedback:
- “Input folder not found: C:\Photos”
- “Watermark image could not be loaded: Invalid format”
- “Successfully processed 15 of 20 images (5 errors)”
What I Learned
1. Start Simple, Then Expand
I began with a basic console app that could watermark one image. Once that worked, I added batch processing, then multiple formats, then the Windows UI. Building incrementally prevented scope creep and kept me focused.
2. Invest in Good Architecture Early
Taking time to properly structure the code paid dividends when adding the second interface. The Windows Forms app reused almost all the core logic.
3. User Experience Matters Even in Developer Tools
Small touches like smart file dialog navigation and helpful status messages make a huge difference in how pleasant the tool is to use.
4. Modern .NET is Really Good
.NET 9 with nullable reference types, implicit usings, and the rich ecosystem (like ImageSharp) made development smooth and enjoyable.
The Results
The final solution handles my watermarking needs perfectly:
- Console app for batch processing in scripts
- Desktop app for interactive use
- Clean architecture that’s easy to extend
- Professional code that follows best practices
Processing 100 images takes seconds, not hours. The watermarks look professional, and I have complete control over the output.
Try It Yourself
The project structure is straightforward enough that you could build something similar for your own needs. Key lessons to take away:
- Separate your core logic from your UI
- Use async/await for long-running operations
- Provide meaningful progress updates and error messages
- Think about user experience even in simple tools
- Start with the console – it’s often faster to build and test
Whether you need watermarking specifically or just want to see how to structure a multi-interface .NET application, this approach provides a solid foundation.
The best part? Once you have the architecture right, adding new features or interfaces becomes straightforward. That’s the power of good design paying dividends over time.
Take a look at the source code here
What challenges are you solving with code? Sometimes the tools we build for ourselves end up being the most useful and well-designed, because we truly understand the problem we’re solving.
